 |
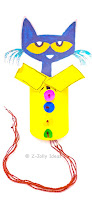
| Puppet Hand of Pete the Cat and His 4 Groovy Buttons |
This idea came into my mind when I desired to tell a story that related to our sub-theme,
Cat. I remembered one of my favorite books, which was, Pete the Cat and His Four Groovy Buttons. I wanted to tell the story to my
preschool students but I did not have the book. Thus, I decided to make a puppet hand so that my students still could had the visuals of the story.
Here is what we need to prepare to create the adorable puppet hand of Pete the Cat and His Four Groovy Buttons:
 |
| Plastic cup (pic. 1) |
 |
| Thick Papers (pic. 2) |
 |
| Pete the Cat clipart (pic. 3) |
 |
| Wool, pins, board marker (pic. 4) |
 |
| Double tape (pic. 5) |
As a teacher, we can be more creative as we wish. We can use any kind of cups as long as they fit in our hands. We can use any kind and any color of thread but I suggest using the small one. We can choose different colors from the colors of the papers shown in picture 2 or use the original colors of the buttons shown in the book. Also, we can use kinds of pins and markers. To stick the papers to the plastic cup, I used double tape. It worked well on the cup. If there is no double tape, we can prepare other kinds of tape or glue. We just need to make sure that they stick well on the cup so that it stays longer to use. Please search Pete the Cat face clipart on google and print it.
Let's jump to the steps of making this adorable puppet hand! :)
- First, stick Pete's face clipart at the bottom of a plastic cup. The bottom is functioned as the top part of his body. Then, you should measure the yellow paper as Pete's clothes to the cup size. It might not be really perfect when we try to put the paper on the cup but it is definitely fine. We just need to make sure that the paper covers all the body parts (see pic 6). Then take some pieces of double tape and stick them on the paper and the cup. We can draw a collar for the cloth with another yellow paper and make lines on the sides with a marker (see pic 7). After that, we can stick them on the top of the body.
 |
| The body (pic. 6) |
 |
| The collar (pic.7) |
- Next, we can draw four circles with different colored papers. I used orange, green, pink, and blue for the buttons. Please take a board marker and use the bottom part for creating circles. If the circles are done, we can stick them to the cloth. We can use a push pin or other small pins to create a hole at the center of each circle.
 |
| Circles for buttons (pic. 8 |
 |
| Creating holes (pic. 9) |
- After creating holes, we can put wools/threads through the holes. The wools/threads function to pop off the buttons (told in the story). Please make sure to tie knots at the ends of the wool.
Now, we can enjoy telling the story of Pete the Cat and His Four Groovy Buttons.
I recommenced this book to be read to children because it is groovy indeed!! It has a song that we can sing along with our children. It also helps them learn about colors, numbers, and subtraction. My students did enjoy the story. They were attracted to how Pete the Cat can stand, hold ice cream, etc. Their favorite part was when each button popped off so that they could say OH NO!! and when the book asks
Did Pete cry? They would answer it together GOODNESS NO!! They like to say them out loud :)
Note: If you haven't read the book, I recommend you to buy them at AMAZON or you can go to http://www.petethecatbooks.com/ If you can't purchase the book, you can go to https://www.youtube.com/watch?v=M2YwCgtvnNg as well to watch the animated story then you can make the puppet hand and do story-telling to your children.
NOW IT IS YOUR TIME TO TRY MAKING IT :) :)


Komentar
Posting Komentar
please give your comment ^_^